Barebow tuning 
Quick(ish) Tuning for Barebow
You can spend many hours tuning your bow, here is a very brief tuning checklist – the basic section won’t take too long, and then when you have more time, you can do the advanced list. There are a number of guides on the website, I have referred to the “Bow tuning tests” guide, which you can find here.
This information comes from many sources, including videos and articles written by Jake Kaminski and Ashe Morgan, and tips directly from Jaime Adams, Richard Buckner and Steve Allam.
Basic tuning
Probably a good idea to check these items every month. They should be done in the following order, as each affect the others.
Tiller
The purpose of adjusting the tiller is to ensure that top and bottom limbs are balanced and working in unison.(See figure 1-3 in tuning tests guide). Check your riser manual, otherwise use the following settings. Tiller is adjusted using the main limb bolts.
Measured from where the limb meets the riser to the string
- If you shoot 2 fingers under, set bottom limb 1/8" closer to the string than top limb
- If you shoot 3 fingers under, start with the tiller at 1/8" as above.
- Barebow; if you intend to string walk, set the tiller equal.
- See the advanced guide for more accurate tiller adjustment
Brace height
The purpose of adjusting the brace height is to get maximum efficiency from the bow.(See figure 1-3 in tuning tests guide). Check your riser manual, otherwise use the following settings. Brace height is adjusted by adding or removing twists in the string.
Measured from button to string (or deepest part of handle to string)
- Somewhere between 8" - 9.5", start with around 9” if unsure.
Nocking point
The purpose of adjusting the nocking point is to ensure good clearance as the arrow leaves the bow and to ensure a ‘straight’ shot to the target.
Measured using bracing gauge, attached to string, resting on arrow rest
Top of bottom nocking point (i.e. bottom of arrow) will be 4-6mm above perpendicular; start with 6mm if unsure
- Barebow with string walking, set to 10mm above
Limb alignment & bow plane
Both of these settings ensure a ‘straight’ shot to the target (left & right). (See figure 1-2 in tuning tests guide).
Place arrow in bow, stand back, look at how string lines up with limbs, riser bolts, and ensure it is straight – with the string going down the centre of each limb, and through the centre of all limb bolts
Adjustment is done using the side bolts near each limb pocket
Next, check that the bow is ‘in plane’ – it is easiest to check this with a long rod attached (no v-bars). When you stand behind the bow, looking at how the string lines up with the limbs and bolts, check that the long rod also lies behind the string. If it is to one side, then both limbs need moving one way or the other by the same amount, to bring the long-rod into the same plane as the string and riser.
Adjustment is done using the side bolts near each limb pocket
Centre shot
Whilst keeping that picture, nock an arrow and see where tip of the arrow is in relation to string.
The arrow tip should be just to the outside of the string (away from the bow), adjust by moving the pressure button in or out
Button & Rest
The rest should be adjusted up or down so that the button touches the centre of the arrow shaft.
Note that for barrelled shafts (e.g. x10), you should do this for the part of the arrow that is next to the button when at full draw, as this part is thinner than the part touching at brace height – this is the same for the centre shot.
Balance
A bow when shot has a tendency for the top limb to travel backwards and hit you on the head. This is counteracted by adding weights to the bow. Barebow archers need to add flat weights (for competition, the unstrung bow needs to fit through a 12.2cm circle) which should result in a vertical balance point in the centre of the bow - which will result in the bow jumping forward after a shot.
Advanced
The following tests are only necessary (or possible) if you are able to consistently get nice tight arrow groups. The order in which these are done is important, as it is possible to ‘false tune’ your bow by setting one thing badly and another thing badly to compensate.
The aim of this tuning is to match your bow to your arrows, and to ensure that your tune is as forgiving as possible, enabling you to shoot better groups regardless of your shot….well….you have to make good shots right?
A good order to carry these steps out is:
Ensure you have followed a basic tune with:
Limbs/string in alignment
- Tiller, brace height, nocking point, centre shot as above
- Pressure button using medium spring, on medium setting
Tiller tuning
- Bare shaft tuning – rough check
- Centre shot tuning (walk back)
- Bare shaft tuning – final
- Centre shot tuning (walk back) – quick check
Tiller tuning
Tiller controls how the top and bottom limbs "work together". An ideal set-up is achieved when, at full draw, both limbs are flexed the same amount, holding the same energy - so that, when the string is released, both limbs carry out the same movement, through the shot. If tiller is uneven, the bow will be noisier, and the arrow flight will be affected. The section above essentially sets "static tiller" only. This section describes how to set dynamic tiller.
Tiller needs to be set based on your hook - 3 under, split finger and string walking all affect how the tiller should be tuned. If you string walk, you will need to decide at which crawl you will tune the bow - this can be your mid crawl, or the crawl that equates to your most commonly shot distance. Once the bow is tuned here, any other crawl will de-tune the bow somewhat.
The easiest way to check dynamic tiller is to have someone photograph you whilst you have the bow at full draw (using the chosen crawl). Then, take the picture and either use a staight edge, or import into a graphics package, and draw a box. See pics below:
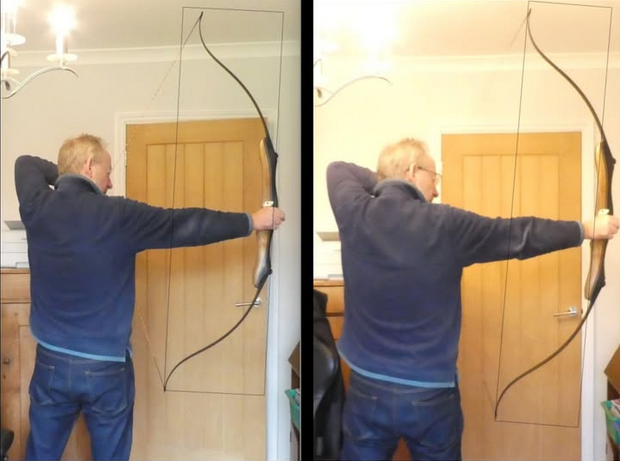
In the first picture, you can see that the top limb is not being drawn back as far as the bottom limb. To adjust, either the top limb must be wound out, or the bottom limb wound in (or a combination of the two). With adjustment, the bow will be balanced, as per the second picture.
The graphics package was used to draw in the black rectangle, and then position the rectangle over the tiller bolts (first pic), or where the limbs meet the riser, - rotated accordingly, and then expand the box until one corner is on one of the limbs.
Bare shaft button tuning (and more accurate nocking point tuning)
This should be done at 18m and 30m (no more than 30m, no less than 15m). If you only have 18m indoors, then you can do there, but it is good to check at another distance.
This is done before the centre shot check, just to ensure that your set-up is vaguely ok, and then after the centre shot to do it properly!
You should warm up first, shoot a dozen arrows or so, and be confident at shooting a good group at 30m.
Shoot normal arrows and bare shafts until a good group is obtained (it doesn’t matter where the group is on the target). If the bare shafts land outside the group, adjust as follows:
If bare shafts are low (a little low is good), move nocking point down
- If bare shafts are high, move nocking point up
- If bare shafts are right, the arrows are too weak (too stiff if left handed)
- If bare shafts are left, the arrows are too stiff (too weak if left handed)
Note that if the bare shafts are high or low of the group, adjust the nocking point before continuing with left-right issues.
If the arrows are too weak, then you need to:
Lessen the poundage of your bow (unwind both limb bolts by the same amount)
- Shorten the arrow
- Use a lighter arrow point
- Use different arrows!
If the arrows are too stiff, then you need to:
Increase the poundage of your bow (wind in both limb bolts by the same amount)
- Lengthen the arrow (tricky huh)
- Use a heavier arrow point
- Use different arrows!
Many guides instruct changing the pressure button spring tension to change the characteristic of the arrow – and this can be done, but you are then masking the fact that the arrows and bow are not correctly in tune – and you then potentially end up with a very unforgiving set-up. The spring should act as a ‘shock absorber’ to dampen down the affects of differing releases between shots. If used as a way of forcing the amount of arrow flex, it loses the ability to dampen these.
Once you are happy with the bare shafts at one distance, move to the other distance and recheck – all should be ok at that distance too – if not, then there is a possibility that your arrows are badly mismatched to your bow.
Centre shot tuning (Walk back)
The position of the centre shot will affect where your arrows land at different distance (left or right). Pin a large target face on backwards and use a spirit level or plumb bob to draw a line down the centre of the face. Mark a large blob near the top of the line.
Use your gap, or crawl for 10m and stand 10m from the boss.
- Shoot a couple of arrows, aiming at the mark at the top of the line. They should hit this mark!
- Leaving your gap/crawl where it is, walk back to 20m, and aim at the same mark. The arrows should hit the line a bit further down
- Repeat at 30m, and 40m – if your boss is tall enough to allow you to hit the line (do not adjust your gap/crawl)
Examine the arrow pattern:
Arrows in a straight line down target, all ok
- Sloped down to left, move button in towards the riser (out if LH)
- Sloped down to right, move button out away from the riser (in if LH)
Each time you make an adjustment, you will need to reshoot at 10m and then at your furthest distance (the ones in between aren’t really needed, but walking back the first time allows you to find the furthest distance where you still hit the boss!)
When you make changes, you are looking to get the arrows at 10m and your furthest distance above/below each other – for example they can both be a bit to the right of the actual line, as long as they are on the same vertical. Once this is achieved, you will have to adjust your string picture to get them both back to the line.
Fine tune brace height
Tricky this one – the ‘best’ bracing height is when the bow is shooting most efficiently, and at this point it is quietist.
Listen to the shot
- Adjust bracing height up and down, by adding/removing twists to the string until the shot is quietest
Many bows will have a riser manual, you can usually find the minimum and maximum brace heights the manufacturer recommends. Talk to an experienced archer of that bow style before you consider adjusting your brace height beyond the minimum or maximum recommended brace height.
Fine tune tiller
Two methods:
Come to full draw and have someone take a photo from the side. Use a protractor on the picture to check that the limb tips are at the same angle when the mid-line of the protractor is in line with the arrow
At 10m, come to pre-draw, place arrow tip on gold. Draw whilst watching arrow tip.
If you notice tip drifts up, increase tiller (tighten bottom limb)
- If you notice tip drifts down, decrease tiller (loosen bottom limb)
Fine Tune Walk Back Check
This needs to be done when you have the range to yourself! Start at a 40m target, stand 15m from boss, aim near the top centre of the target, shoot one or two arrows, then move back in 5m intervals and shoot at same point without adjusting your aim. The arrows will land lower down the target as you move back.
Examine the arrow pattern:
Arrows in a straight line down target, all ok
- Sloped down to left, reduce spring tension (increase if LH)
- Sloped down to right, increase spring tension (decrease if LH)
- Curved to left, move button in (out for LH)
- Curved to right, move button out (in for LH)